Inverse Kinematics Devlog
What is Inverse Kinematics?
Forward kinematics is a way to calculate an end effector's position and rotation given the number of joints, the distance between each joint and the angle each joint is rotated. Inverse kinematics does the opposite: given the end effector's position and rotation and try to solve for each joint's rotation.
Importance of Inverse Kinematics
Why do we need inverse kinematics? The simple answer is for very precise robotic arm movements. In fact, we as humans have this built into our brains!
Try it out! Use your wrist as an end effector and try to move it in a line as straight as possible. While you're doing this, you can see how your elbow bends without you even thinking about bending it. This is what we call inverse kinematics.
Procedural Animation
Inverse kinematics is mostly used in robotics but it can be adapted for procedural animation! You might even see it already built into rigging/animation software like Blender where they use IK targets to move arms around.
We have many reasons for using inverse kinematics in procedural animation. One of the main reasons is its modularity, being able to be used for limbs from arms to legs to even fingers!. This is especially important as it prevents problems like floating feet when walking down slopes.
The Math behind Inverse Kinematics
Now that we know what inverse kinematics is and what it's used for, we can talk about the mathematics behind inverse kinematics. For the sake of my sanity, I will not be talking about the solutions for anything past a three-link solution.
Two-Link Inverse Kinematics
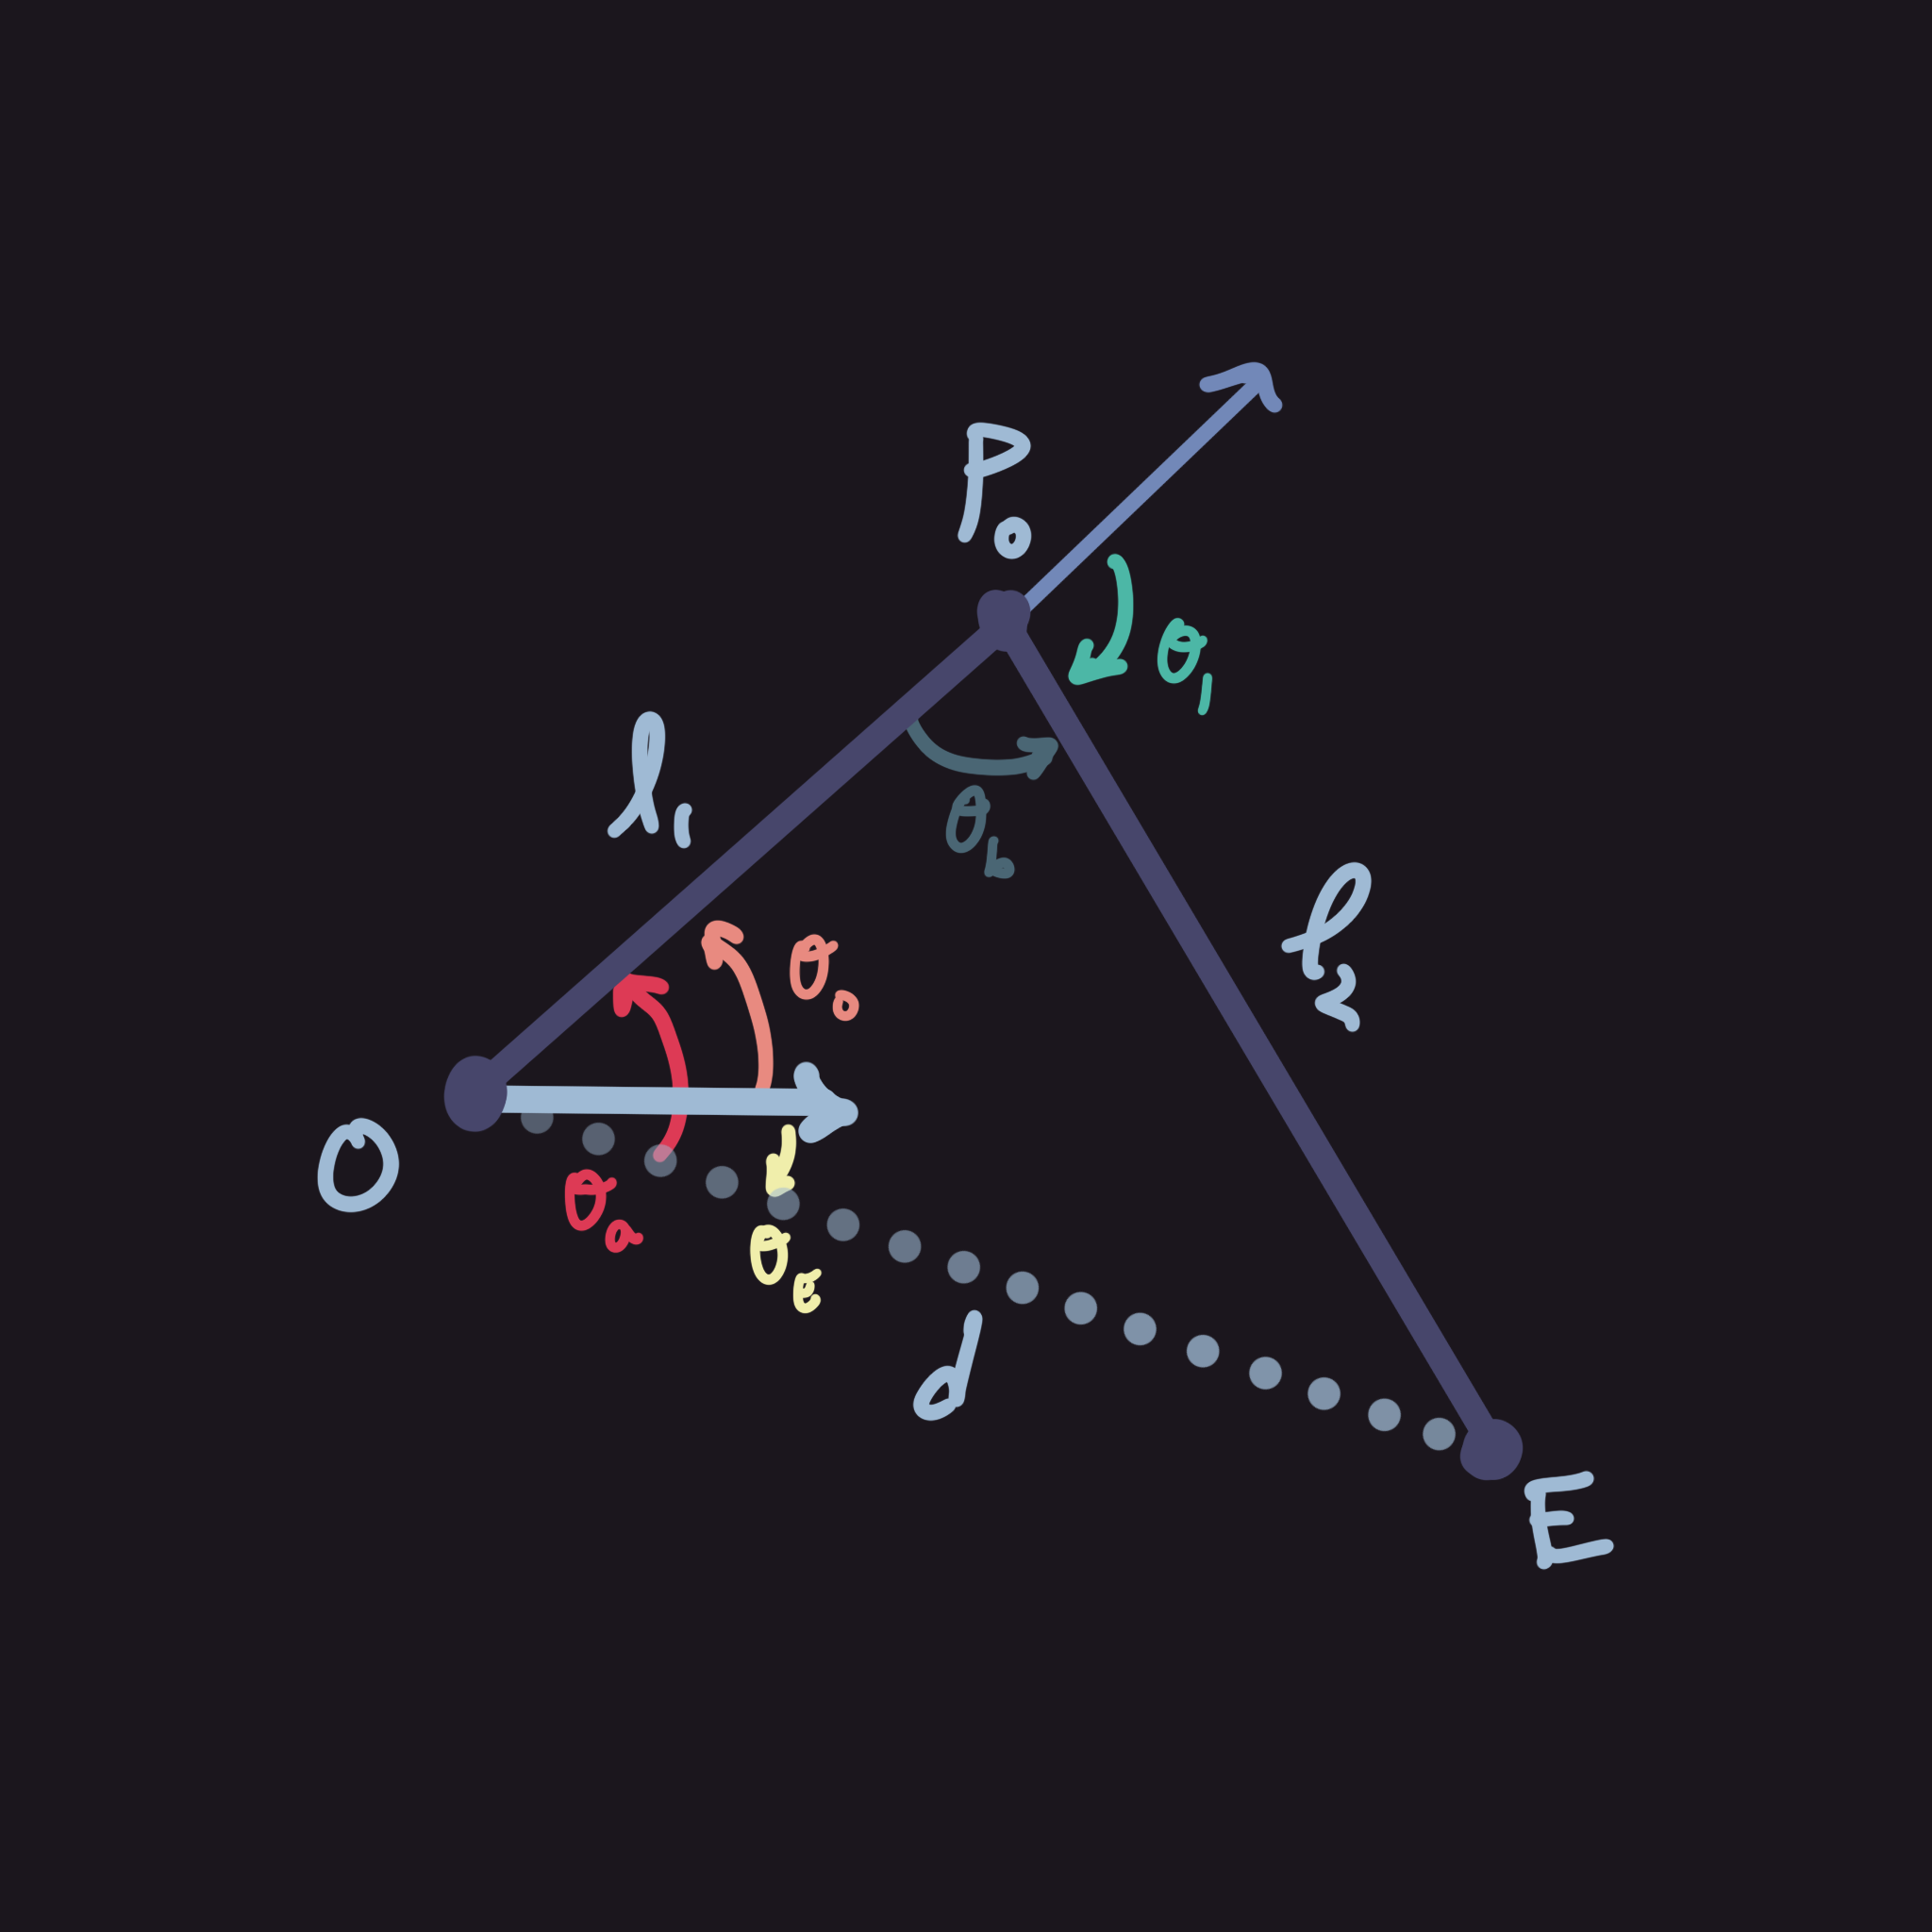
While this problem might seem daunting at first, it really isn't that hard of a problem to solve. This is especially apparent when we draw a diagram, but first we should know what we have and are looking for. First, what we know:
- $O$ - origin's position
- $E$ - end effector's position
- $l_1, l_2$ - the first and second link's length respectively
- $d$ - the distance between $O$ and $E$
- $\theta_E$ - the angle from the origin to the end effector (be careful when calculating this and make sure to use $\text{atan2}(y,x)$ instead of the normal trig functions or else the signs are going to act weird)
Now that we know what we get to work with, let's define what we need to try and solve for:
- $\theta_0, \theta_1$ - the calculated angle for the first and second joints respectively
Solving the System
The easiest way to understand the problem is to draw a diagram (see top right).
Using this diagram, it is much easier to see that we are essentially just solving a triangle. If you know how to use law of cosines, its very easy to see where this is going but for those of you who don't, I will explain below.
Essentially, our problem trickles down to a triangle where we need to solve the internal angles of the triangle. The first step is to solve for $\theta_0$ by using the internal angle opposite from $l_2$. This internal angle, $\theta_a$, can be solved for using the law of cosines. Below is a symbolic solution for $\theta_a$ and $\theta_0$.
$$ \begin{align*} l_2^2&=d^2+l_1^2-2dl_2\cos\theta_a\\ 2dl_2\cos\theta_a&=d^2+l_1^2-l_2^2\\ \cos\theta_a&=\frac{d^2+l_1^2-l_2^2}{2dl_2}\\ \theta_a&=\cos^{-1}\left(\frac{d^2+l_1^2-l_2^2}{2dl_2}\right),\frac{d^2+l_1^2-l_2^2}{2dl_2}\in[-1,1]\\ \text{Since }\theta_a&=\theta_0+\theta_E,\text{ therefore }\theta_0=\theta_a-\theta_E \end{align*} $$
Next we need to calculate $\theta_1$. This is practically the same, so just repeat the process. (If you are using degrees, swap $\pi$ for $180^\circ$)
$$ \begin{align*} \theta_b&=\cos^{-1}\left(\frac{l_1^2+l_2^2-d^2}{2l_1l_2}\right)\\ \text{Since }\theta_1&\text{ is the exterior angle,}\\ \text{then }\theta_1&=\pi-\theta_b. \end{align*} $$
Now that we have $\theta_0$ and $\theta_1$, we can finally orient our arm to have the end effector be at the target position! Just apply the rotations onto your joints and it should work properly!
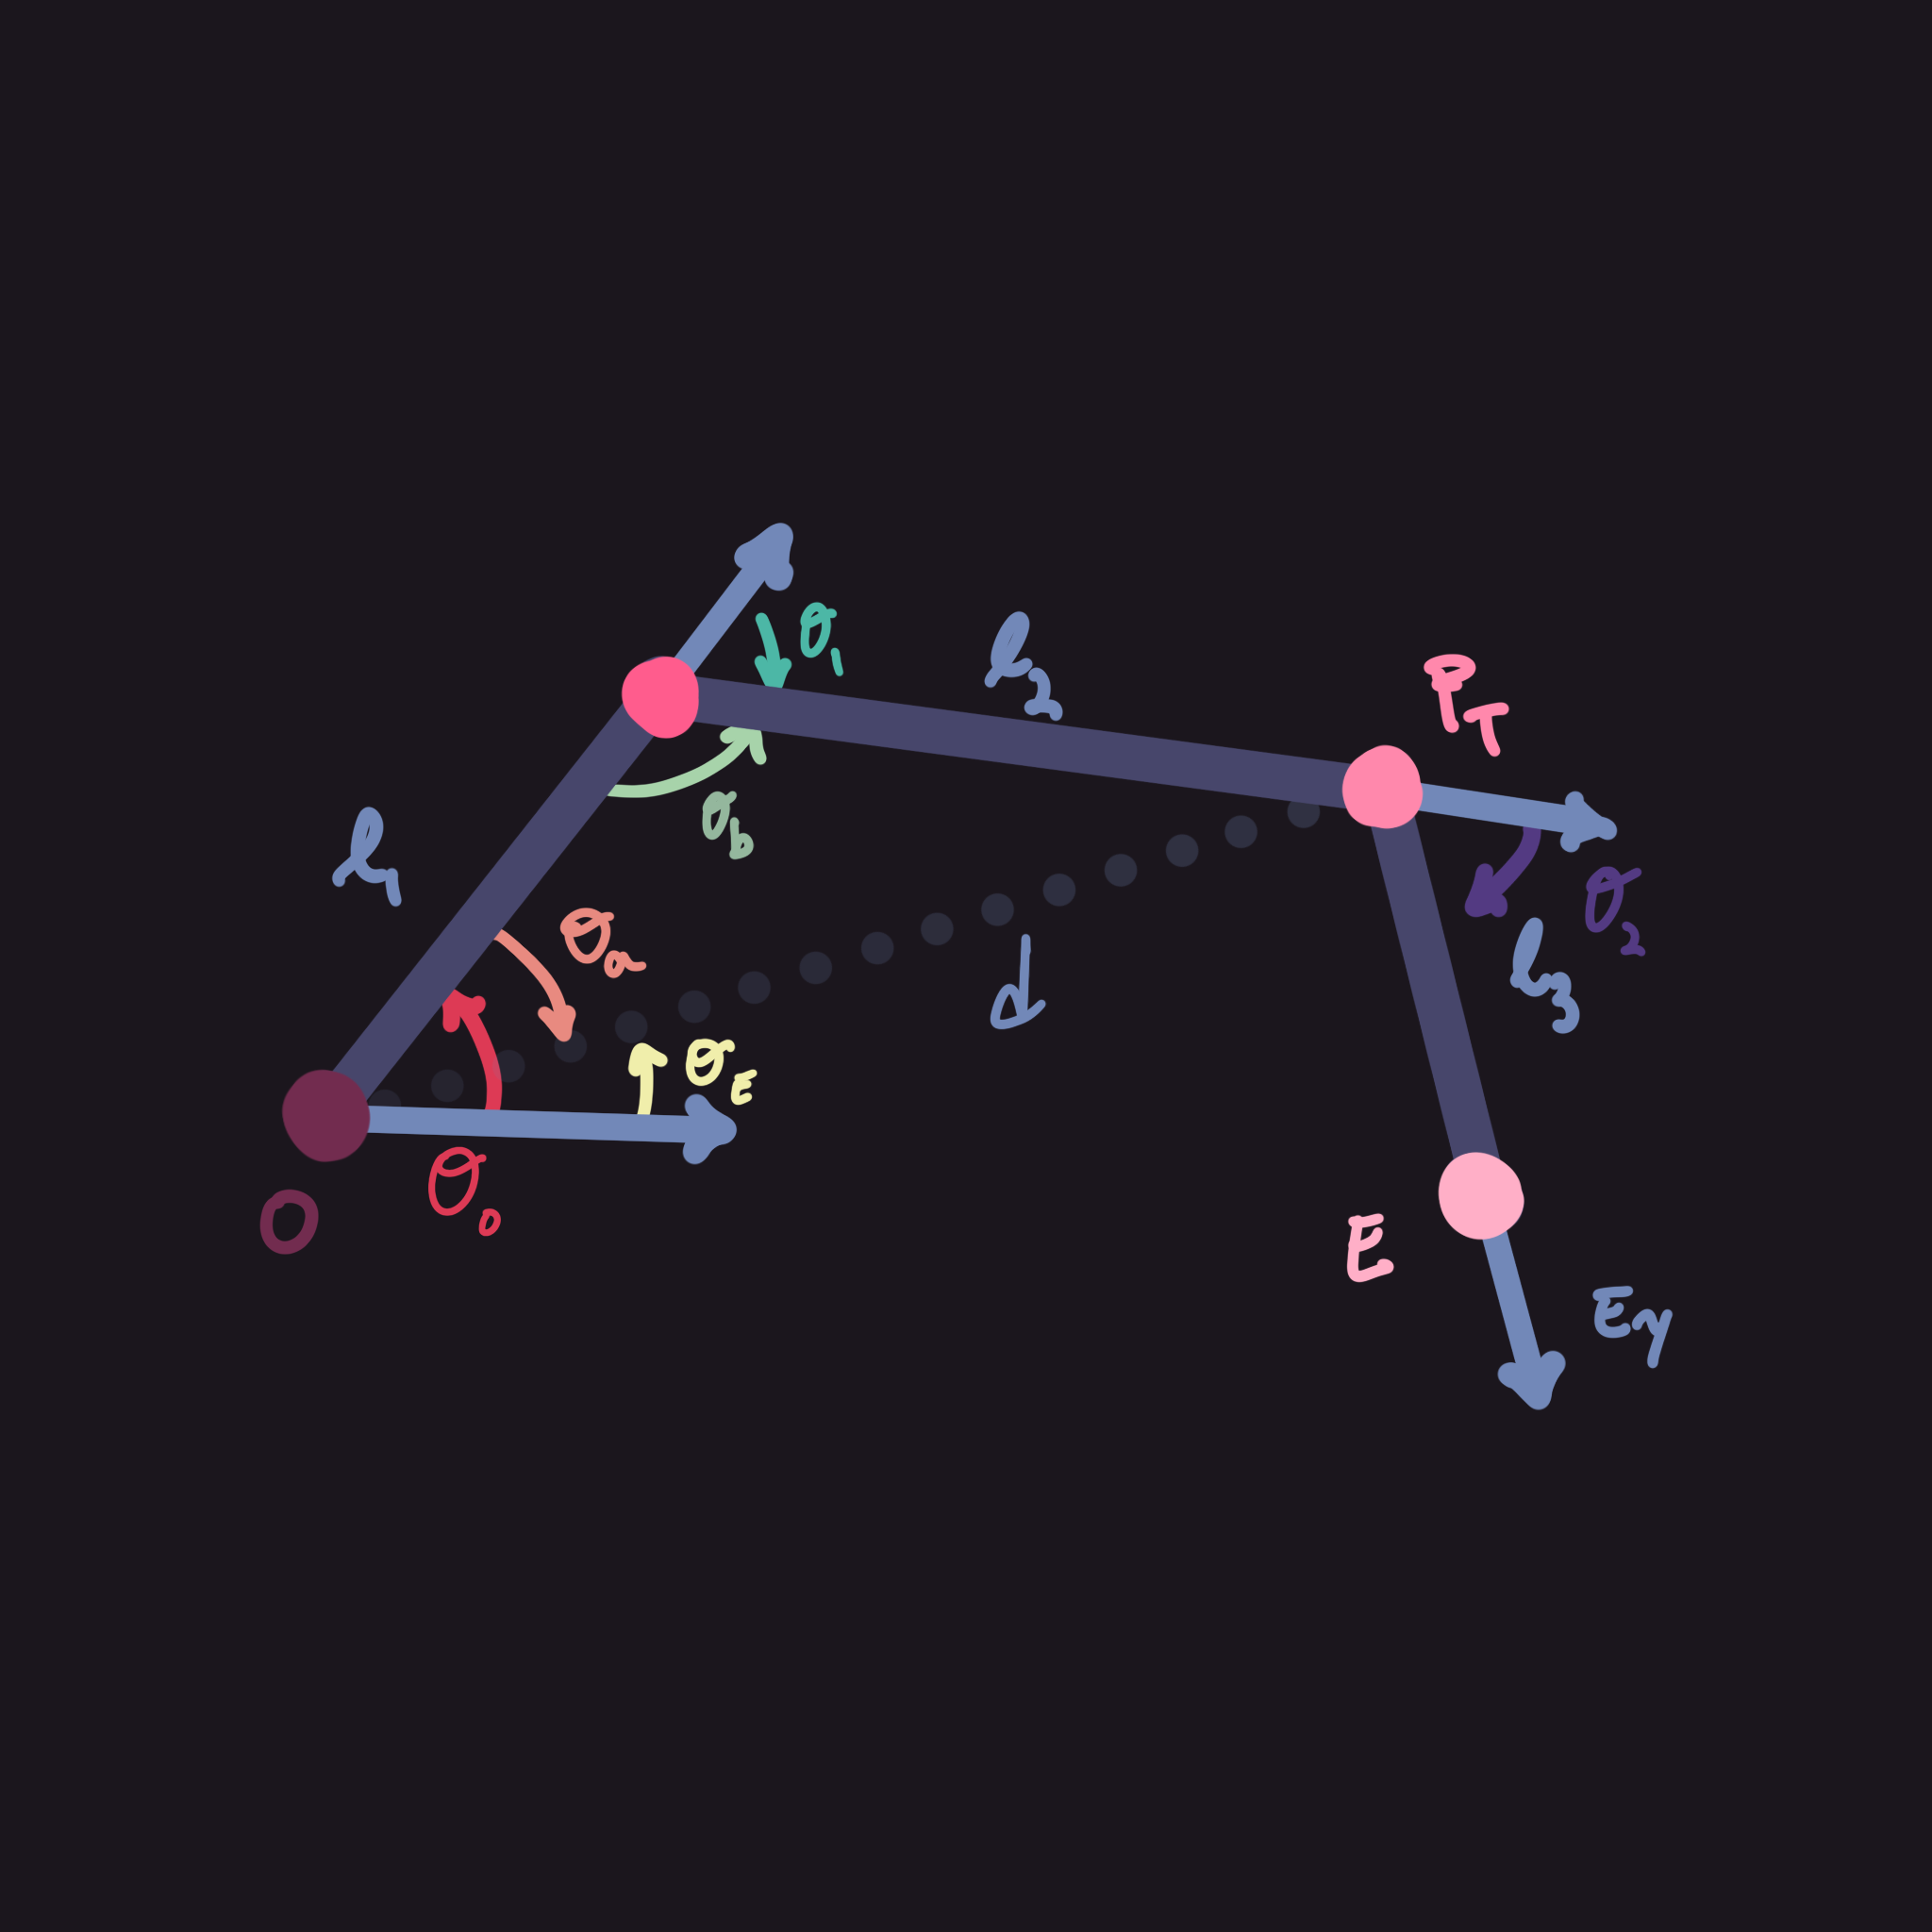
Three-Link Inverse Kinematics in $\mathbb{R}^3$
Starting this chapter, I want to preface that this is surprisingly easy to do. We can pretty much just reduce this problem into a two-link problem in 2D. By doing so, we can remove a degree of freedom and add it back later after the harder calculations are done.
First, let's define our known variables. Most variables are the same but some are changed for example:
- $O$ - origin's position in $\mathbb{R}^3$
- $E$ - end effector's position in $\mathbb{R}^3$
- $l_1, l_2$ - the first and second link lengths respectively
We also introduce some new variables so that we don't end up with infinite solutions:
- $l_3$ - since we are doing a three-link problem we do need the third link length
- $E_y$ - end effector's up vector in $\mathbb{R}^3$ (this can be done using the rotation but it's easier with the up vector)
- $O_x$, $O_y$, $O_z$ - unit vectors that define $O$'s local space
Now we need to talk about what we are trying to find. I moved $d$ and $\theta_E$ here since they are calculated fairly differently compared to their 2D counterparts.
- $\theta_0,\theta_1,\theta_2$ - the calculated angles for joints 1, 2 and 3 respectively
- $\theta_E$ - the angle on the projected plane from $O$ to $P_T$ (defined later)
- $d$ - the distance from $O$ to $P_T$ (defined later)
Solving the System
The easiest way to understand and solve this problem is by projecting the entire equation onto a plane and solving as if it was a system in $\mathbb{R}^2$. Projecting something onto a plane might sound scary but we can just fake it by rotating the entire system to be on the xy-plane then rotating it back after.
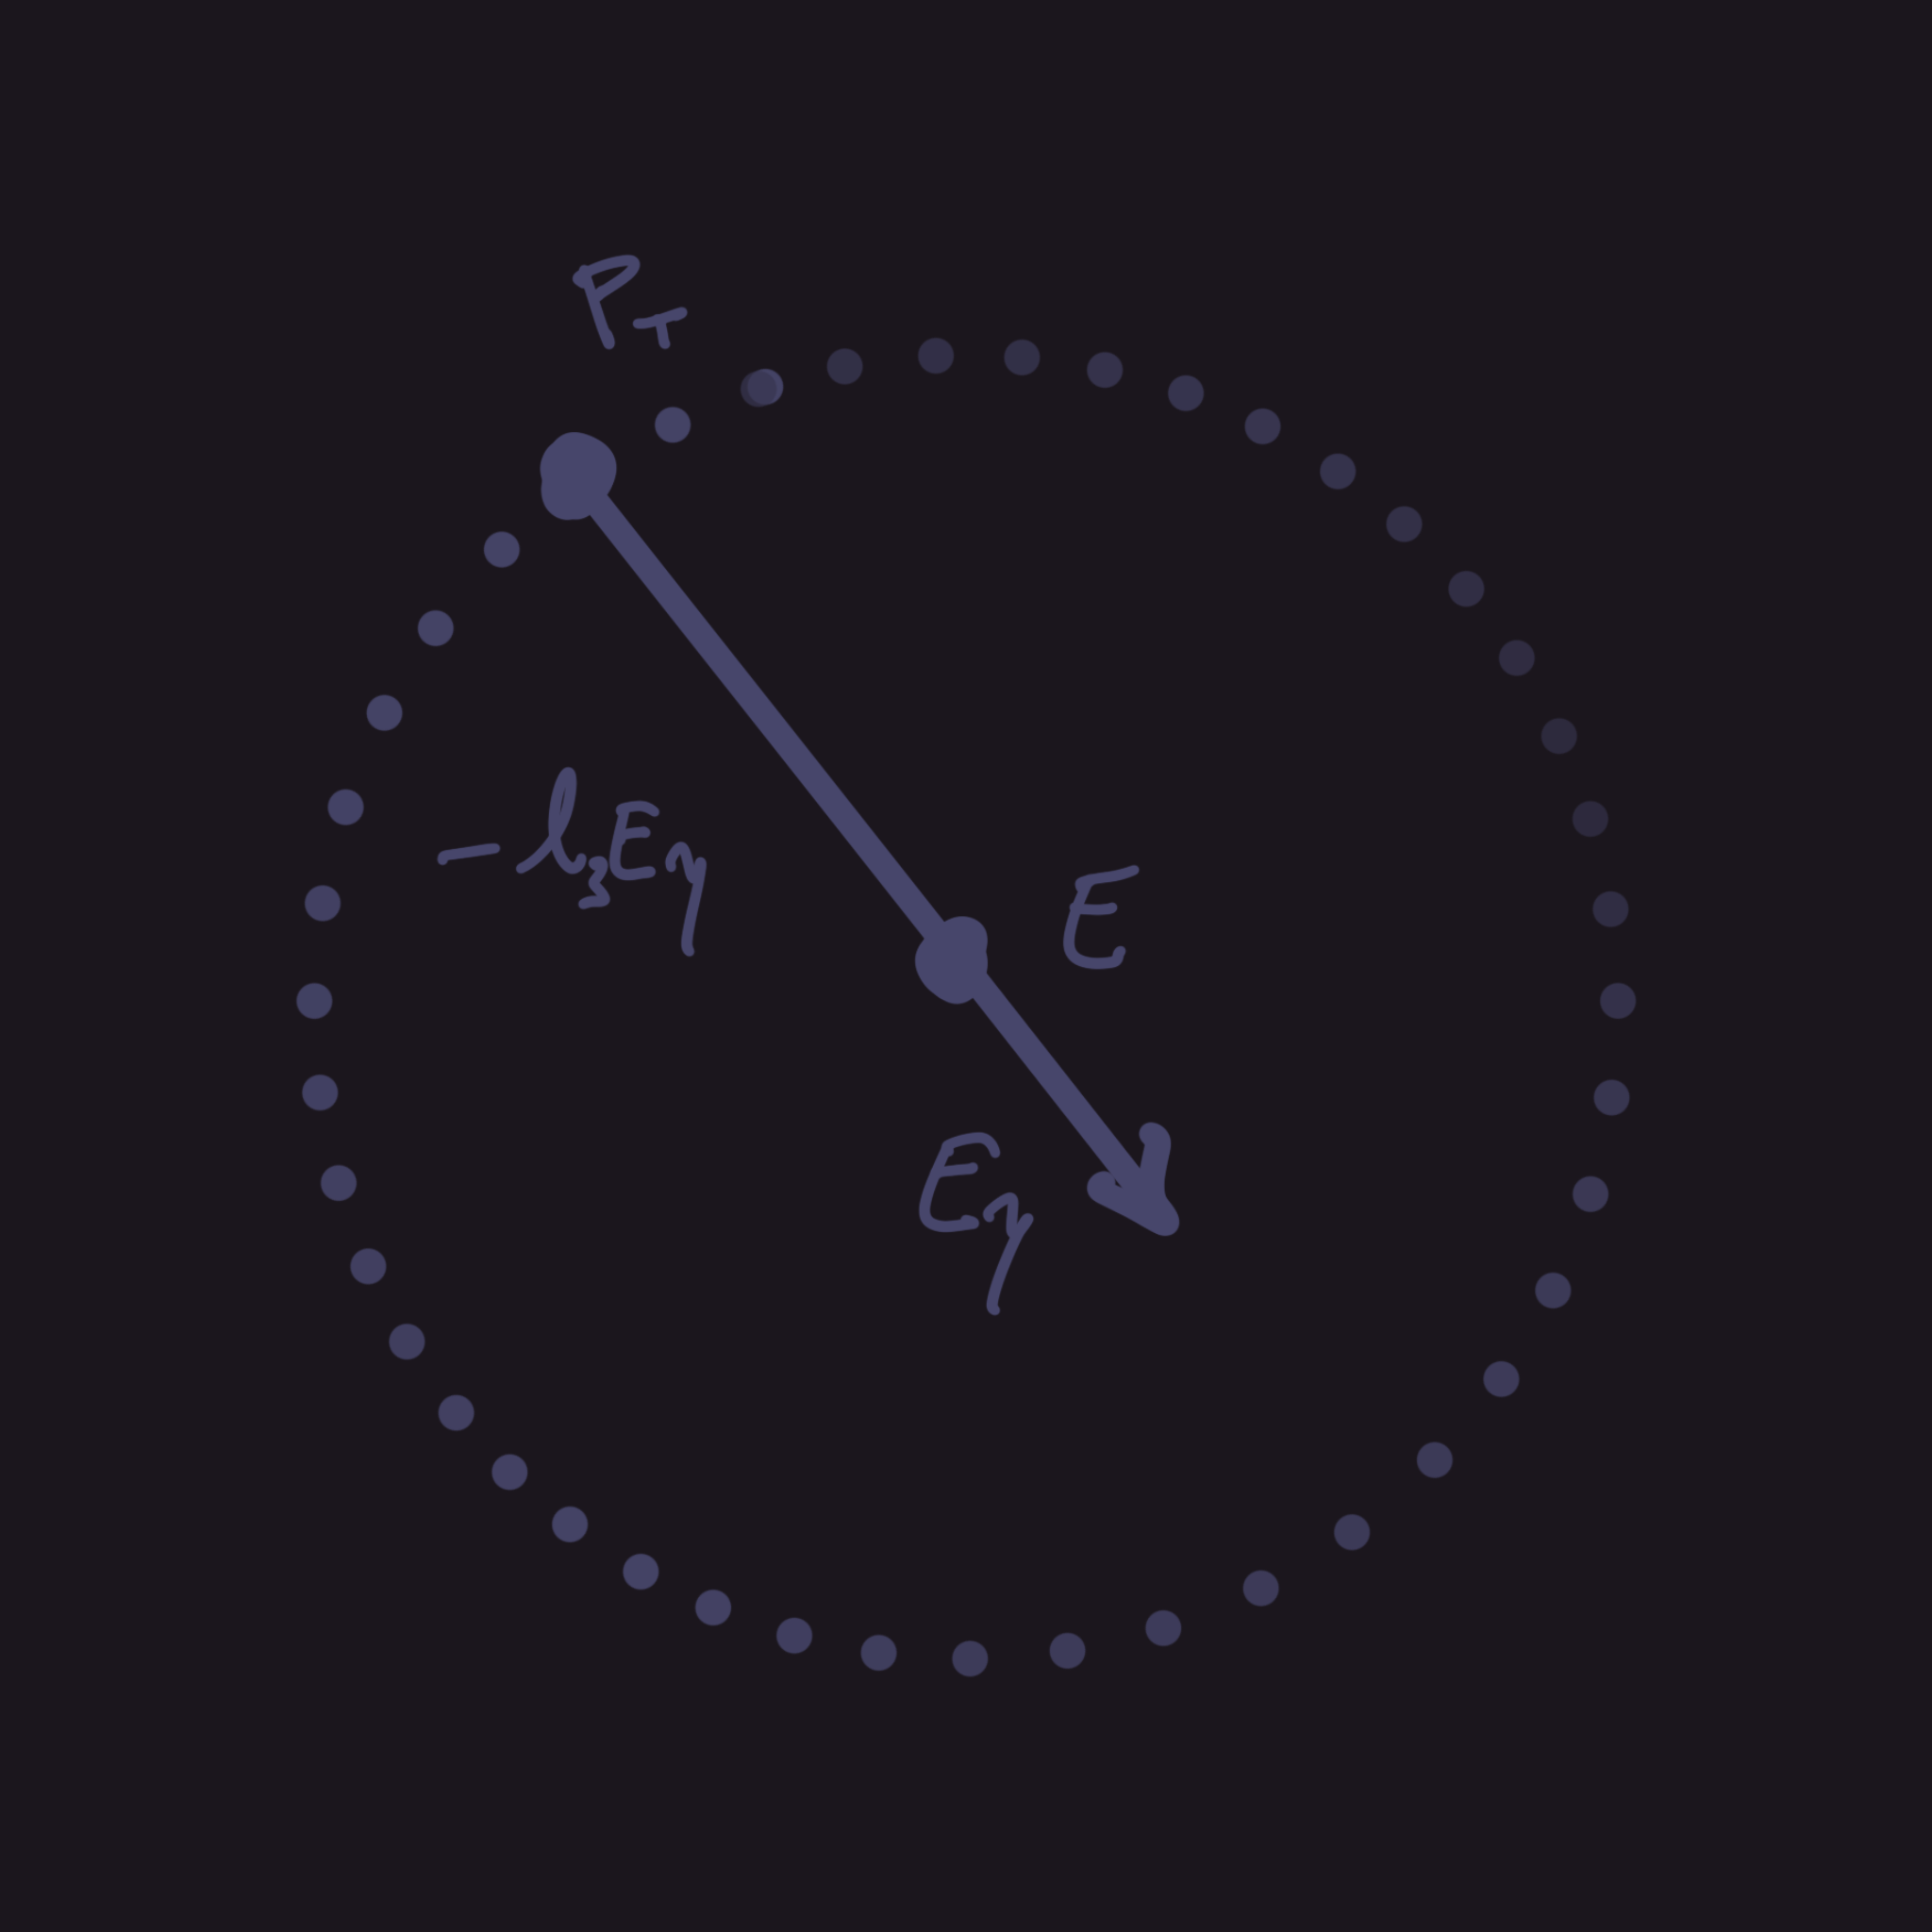
To do this, we do have to define another variable, $\theta_y$. Assuming that the y-axis is up, x-axis is left and z-axis is forward, $\theta_y$ would be the angle we rotate around the y-axis. First we want to make sure that everything is calculated locally so if $O$ is not $(0,0,0)$ then it won't accidentally calculate a wrong end effector position.
So let's define $E_L$ as the end effector position with respect to the origin's position: $E_L=E-O$. We can actually simplify this problem further into a two-link problem if we just use the up vector, $E_y$, and the third-link length, $l_3$, to offset the entire system: $P_T=E_L-l_3E_y$, assuming the last joint respects the $E_y$ condition. This gives us the local position of an intermediate target.
Using $P_T=(x_T,y_T,z_T)$ we can finally solve for $\theta_y$:
$$ \theta_y=\text{atan2}(x_T,z_T) $$
Now that we have $\theta_y$ we can fake the projection of $P_T$ onto the xy-plane. Since we are literally just flattening the z-plane onto the xy-plane, we can just get $P_T$ in $\mathbb{R}^2$ by just replacing the x-value with the magnitude of $P_T$ on the xz plane. I know that might have sounded like gibberish but essentially what we want to do is just replace the $x$ component with $r_T=\sqrt{x_T^2+z_T^2}$. So now $P_T$ should look like $(r_T,y_T,0)$ symbolically.
After we project it, we can finally solve for $\theta_E$ and $d$:
$$ \begin{align*} \theta_E&=\text{atan2}(y_T,r_T)\\ d&=\sqrt{y_T^2+r_T^2} \end{align*} $$
Now we have everything we need and should be able to shove all of this information into our two-link solver where instead of $E$ we just use $P_T$. Assuming you did that, we now have $\theta_0$ and $\theta_1$.
We have two options from here, we can take the easy way out which leads to really weird edge cases or we can do the hard way where it looks somewhat natural.
The Unnatural Easy Way
The easy way is really straightforward but the downside is that if $P_T$ isn't lying in the same plane as $O$ and $E$, then it will look very weird. If you do want to do this way and you don't really care how the system responds to the last joint's orientation, then you can quite literally just set the last joint's up vector to be $E_y$.
The Natural Hard Way
To make it more natural we need to solve for, $\theta_2$. This one is a bit harder than the other $\theta$'s but it's easier to understand once we draw a diagram. To do this we need the up and forward vector of the 3rd joint (given we rotated over the x-axis), namely $J_y, J_z$. Finally, to calculate $\theta_2$ we need to find the $x$ and $y$ values in the 3rd joint's coordinate frame, we will call them $j_y$ and $j_z$:
$$ \begin{align*} j_y&=J_y\cdot E_y\\ j_z&=J_z\cdot E_y\\ \theta_2&=\text{atan2}(j_z,j_y) \end{align*} $$
Now once we rotate all the joints by their respective $\theta$ values it should work, right? No, we still haven't rotated the system so that $O$, $P_T$ and $E$ all lie on the same plane. To do this we need to calculate another angle, $\beta$, which is the roll on the origin we need to rotate it by to align all three points onto the same plane. Since the roll angle will be about $O_z$, we need to project $E_y$ onto the $O_x, O_y$ plane to remove the $O_z$ component. We use the dot products between a transformed $E_y$ (we'll call $E_T$) and the axes of $O$ and put it into the $\text{atan2}$ function to calculate $\beta$:
$$ \begin{align*} \text{Let }O&_x,O_y,O_z\text{ be the axes of }O.\\\\ E_T&=O_x(E_y\cdot O_x)+O_y(E_y\cdot O_y),\ \because |O_x|, |O_y|=1 \end{align*} $$
Using this, we can calculate $\beta$ ($E_T^x,E_T^y$ are the $x$ and $y$ components of $E_T$): $$ \beta=\text{atan2}(E_T^y,E_T^x) $$ If you are doing this in code, or you just don't want that many equations, you can simply ignore $E_T$'s calculations and just have: $$ \beta=\text{atan2}(E_y\cdot O_y,E_y\cdot O_x) $$ You might notice that substituting $E_T^y$ and $E_T^x$ doesn't necessarily always equal the dot products in the line above, but since $O_x$, $O_y$ and $O_z$ are all perpendicular unit vectors, they end up being equal.
To ensure your math will work out, please rotate the angles in this specific order before doing the next step. For example, it is crucial you rotate $O$ by $\theta_y$ before you calculate $\beta$ or else your calculations will be off and it might not align with where it's supposed to go. If you need it, here are the rotations in order:
- Rotate the base $O$ around the y-axis by $\theta_y$.
- Rotate the first joint by $\theta_0$. (you can also use -$\theta_0$)
- Rotate the second joint by $-\theta_1$. (use $\theta_1$ if you used $-\theta_0$ in the previous step)
- Rotate the third joint by $-\theta_2$.
- Finally, rotate the base around its Z-axis by the roll angle $\beta$.
Implementation in Unity C#
Coding this Unity is actually pretty simple. I'll show how to code it in 2D then later project it into a 3D space. I really hope that you actually try and understand the math and how it works instead of just copying the code.
2D Implementation
In case you didn't read the math behind it, the problem we are essentially solving is just completing a triangle given all three side lengths. To do this we will just need to solve for some stuff before we can apply the cosine law.
I do want to just state that I will be solving this in a xy-plane. If you are making this for a 2D game in Unreal Engine for example, you will just need to replace the y-axis with the z-axis.
There are two ways we can actually solve this in Unity but it just depends on the use case:
- Bone Joints System - Calculates the rotation and applies it on the joints to have the end effector reach the target
- Position System - Calculates the position of each joint and sets their positions to it. Rotations are completely ignored in this system. (Don't use this if you have a skinned mesh renderer like a bone)
The "better" solution is often the bone joints system as it should be cheaper and is fairly easy to understand. Inverse kinematics is also used most of the time for animation so its likely the system is already setup for this way.
Honestly for the second system, I really don't know what you could use it for. The only time I've personally used it is for debugging and checking if my math works or if it's Unity that's broken. Anyways, the main drawback of this system is more setup and it not having really having any rotation built-in.
Setup for Both Systems
Anyways, we let's define the variables we know:
public Transform origin; // also known as the shoulder joint transform
public Transform target; // what we are trying to reach

public Transform joint1; // the intermediate joint, the one between the origin and end effector
public Transform endEffector; // the transform for the end effector
public float l1, l2; // the link lengths

// These are only used if solving a 3-link system
public Transform joint2; // the second-last joint
public float l3; // the final link length
Next let's define what we'll need to solve for:
float d; // distance between origin and target
float angI; // the angle from the axis to the vector made from origin - target
float ang1; // the angle of the first joint

float ang2; // the angle of the second joint (used only in 3-link systems)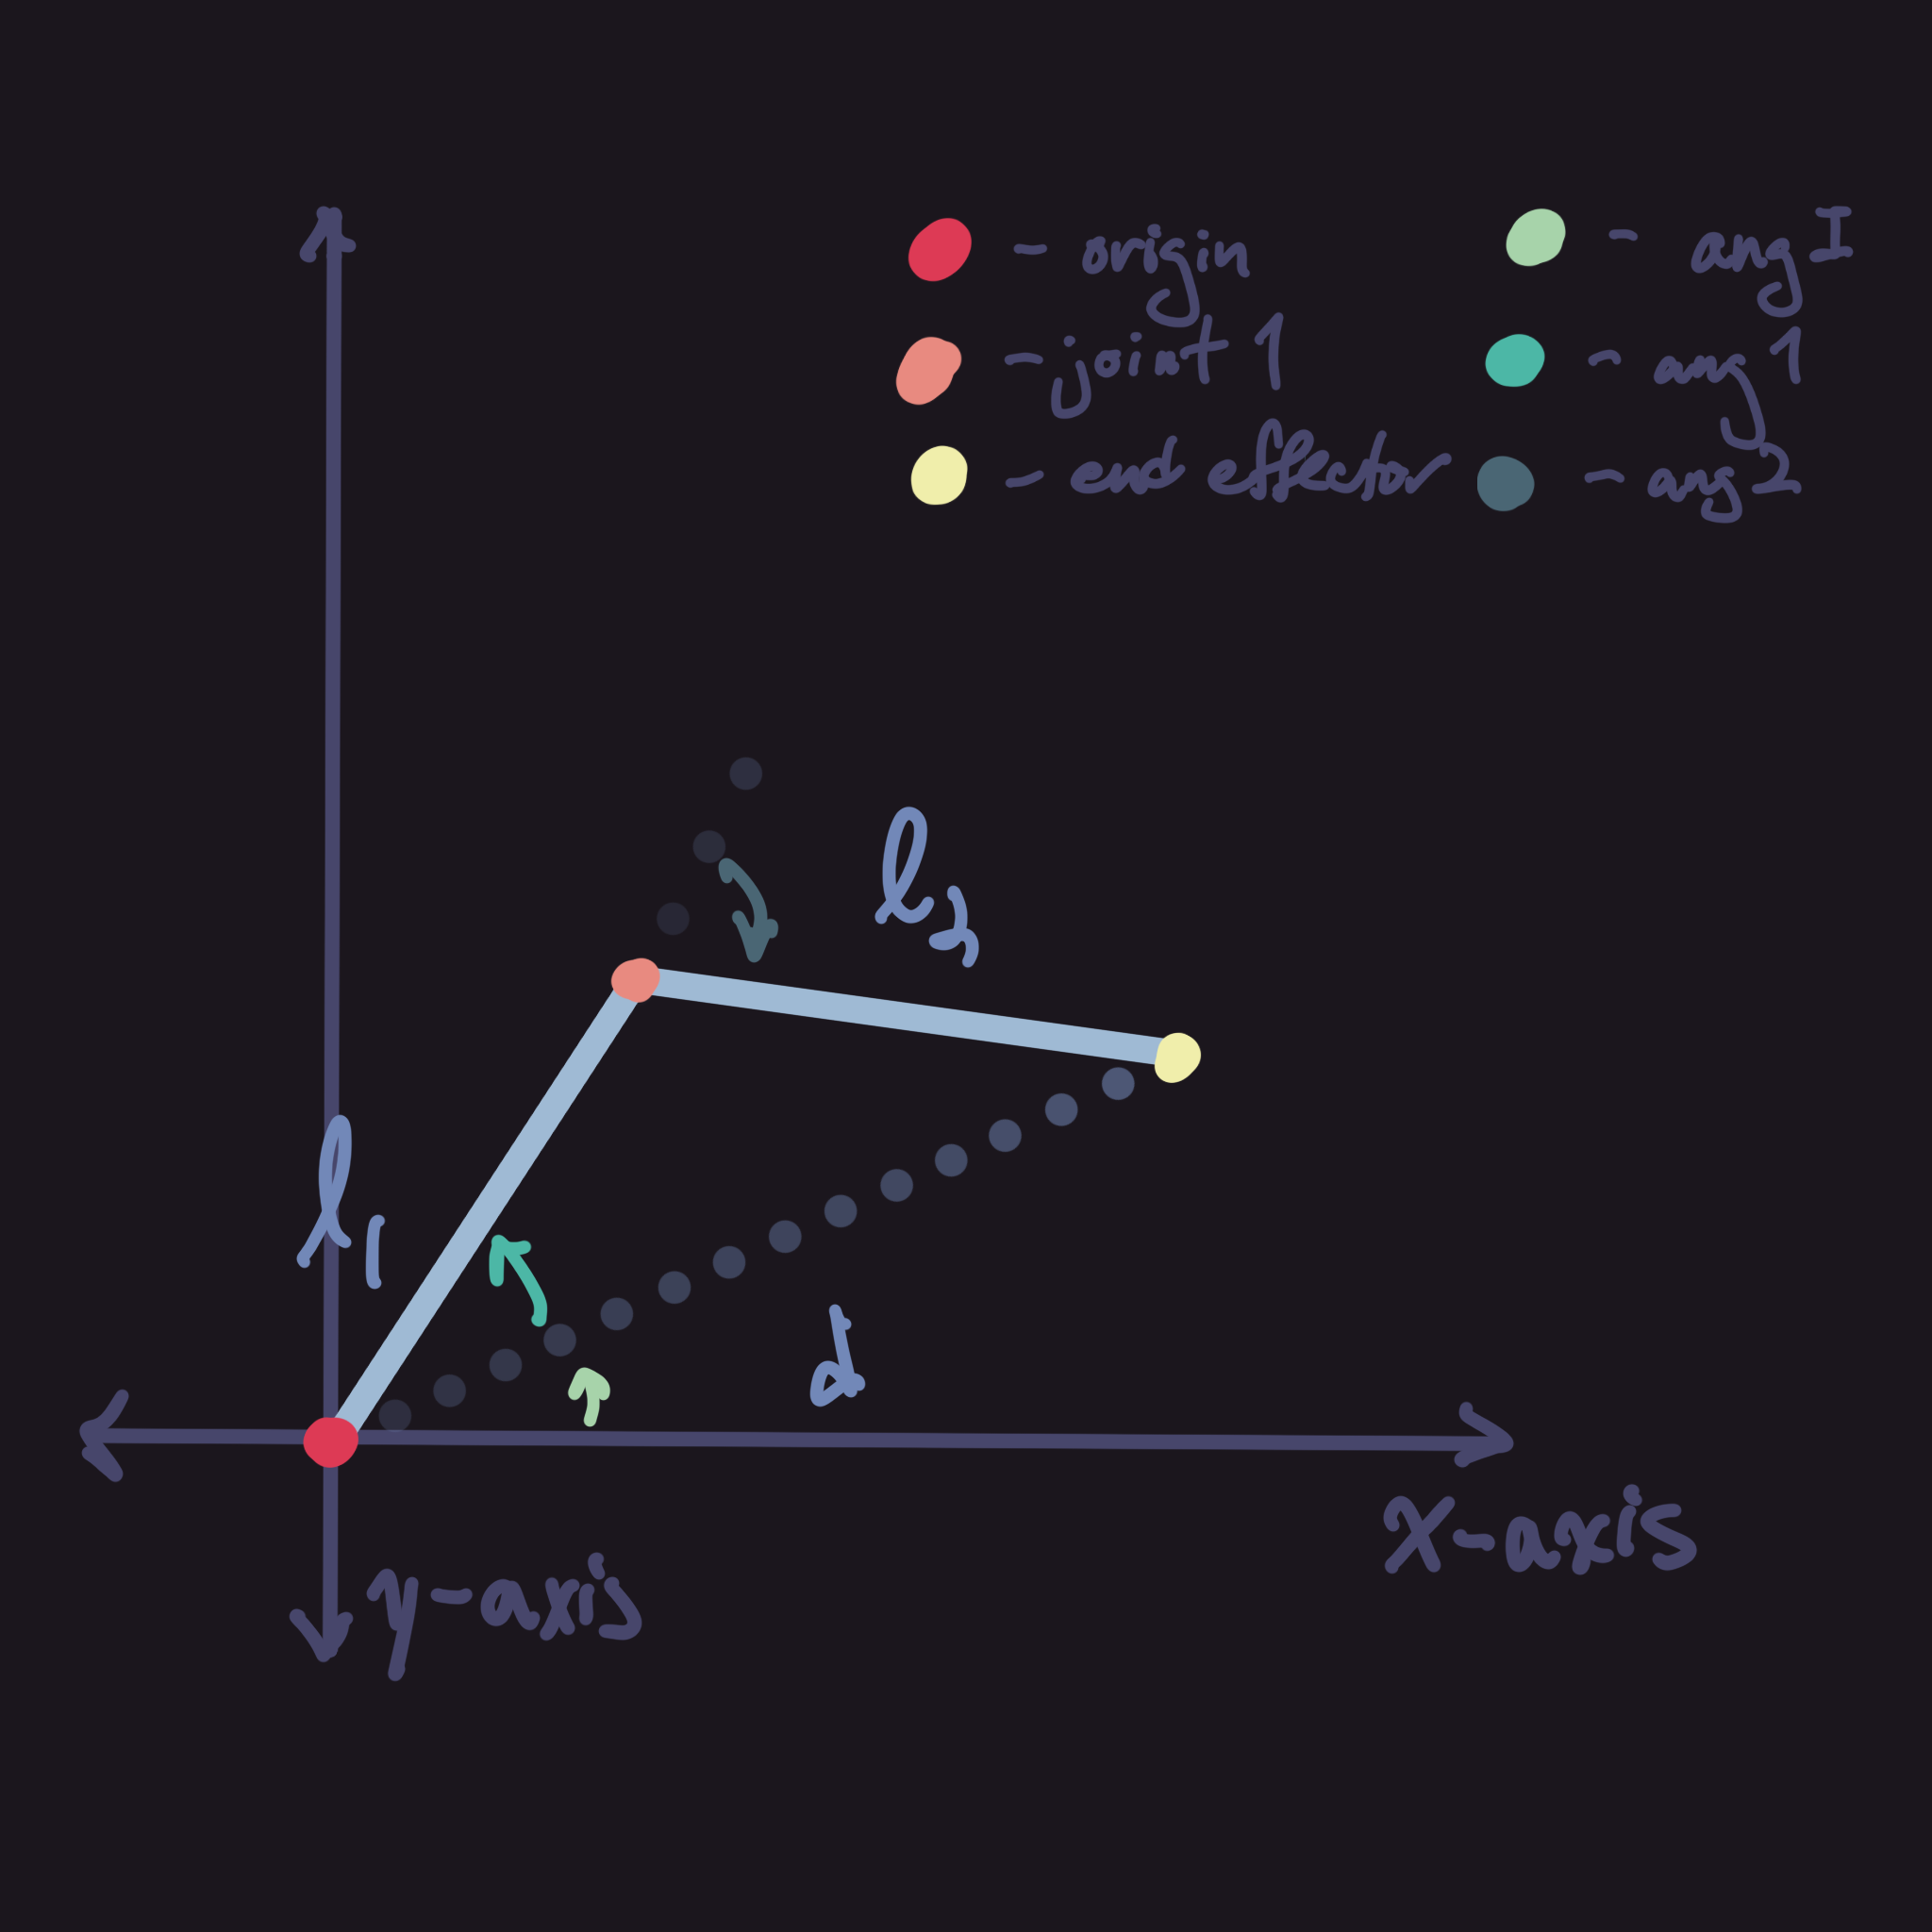
Now we need to calculate these values. It should be pretty simple since we can use the math library that Unity provides:
This code below should allow you to calculate the values correctly. There might be some offsets you still have to apply like $\pi - \theta$ or something similar but its different depending on your setup. Also make sure to convert all your angles back to degrees as it might cause some errors otherwise.
//  Calculate distance & angI first
d = Vector3.Distance(origin.position, target.position); // Vector2.Distance also works

Vector2 localTargetPos = new Vector2(target.position.x - origin.position.x, target.position.y - origin.position.y);
angI = Mathf.Atan2(localTargetPos.y, localTargetPos.x); // Atan2 uses y then x idk why lol

// There might be offsets you might have to add when calculating
ang1 = Mathf.Acos((l1*l1 + d*d - l2*l2) / (2 * l1 * d)); // ang1 is opposite of l2
ang2 = Mathf.PI - Mathf.Acos((l1*l1 + l2*l2 - d*d) / (2 * l1 * l2)); // its an exterior angle so offset accordingly
Error Checks
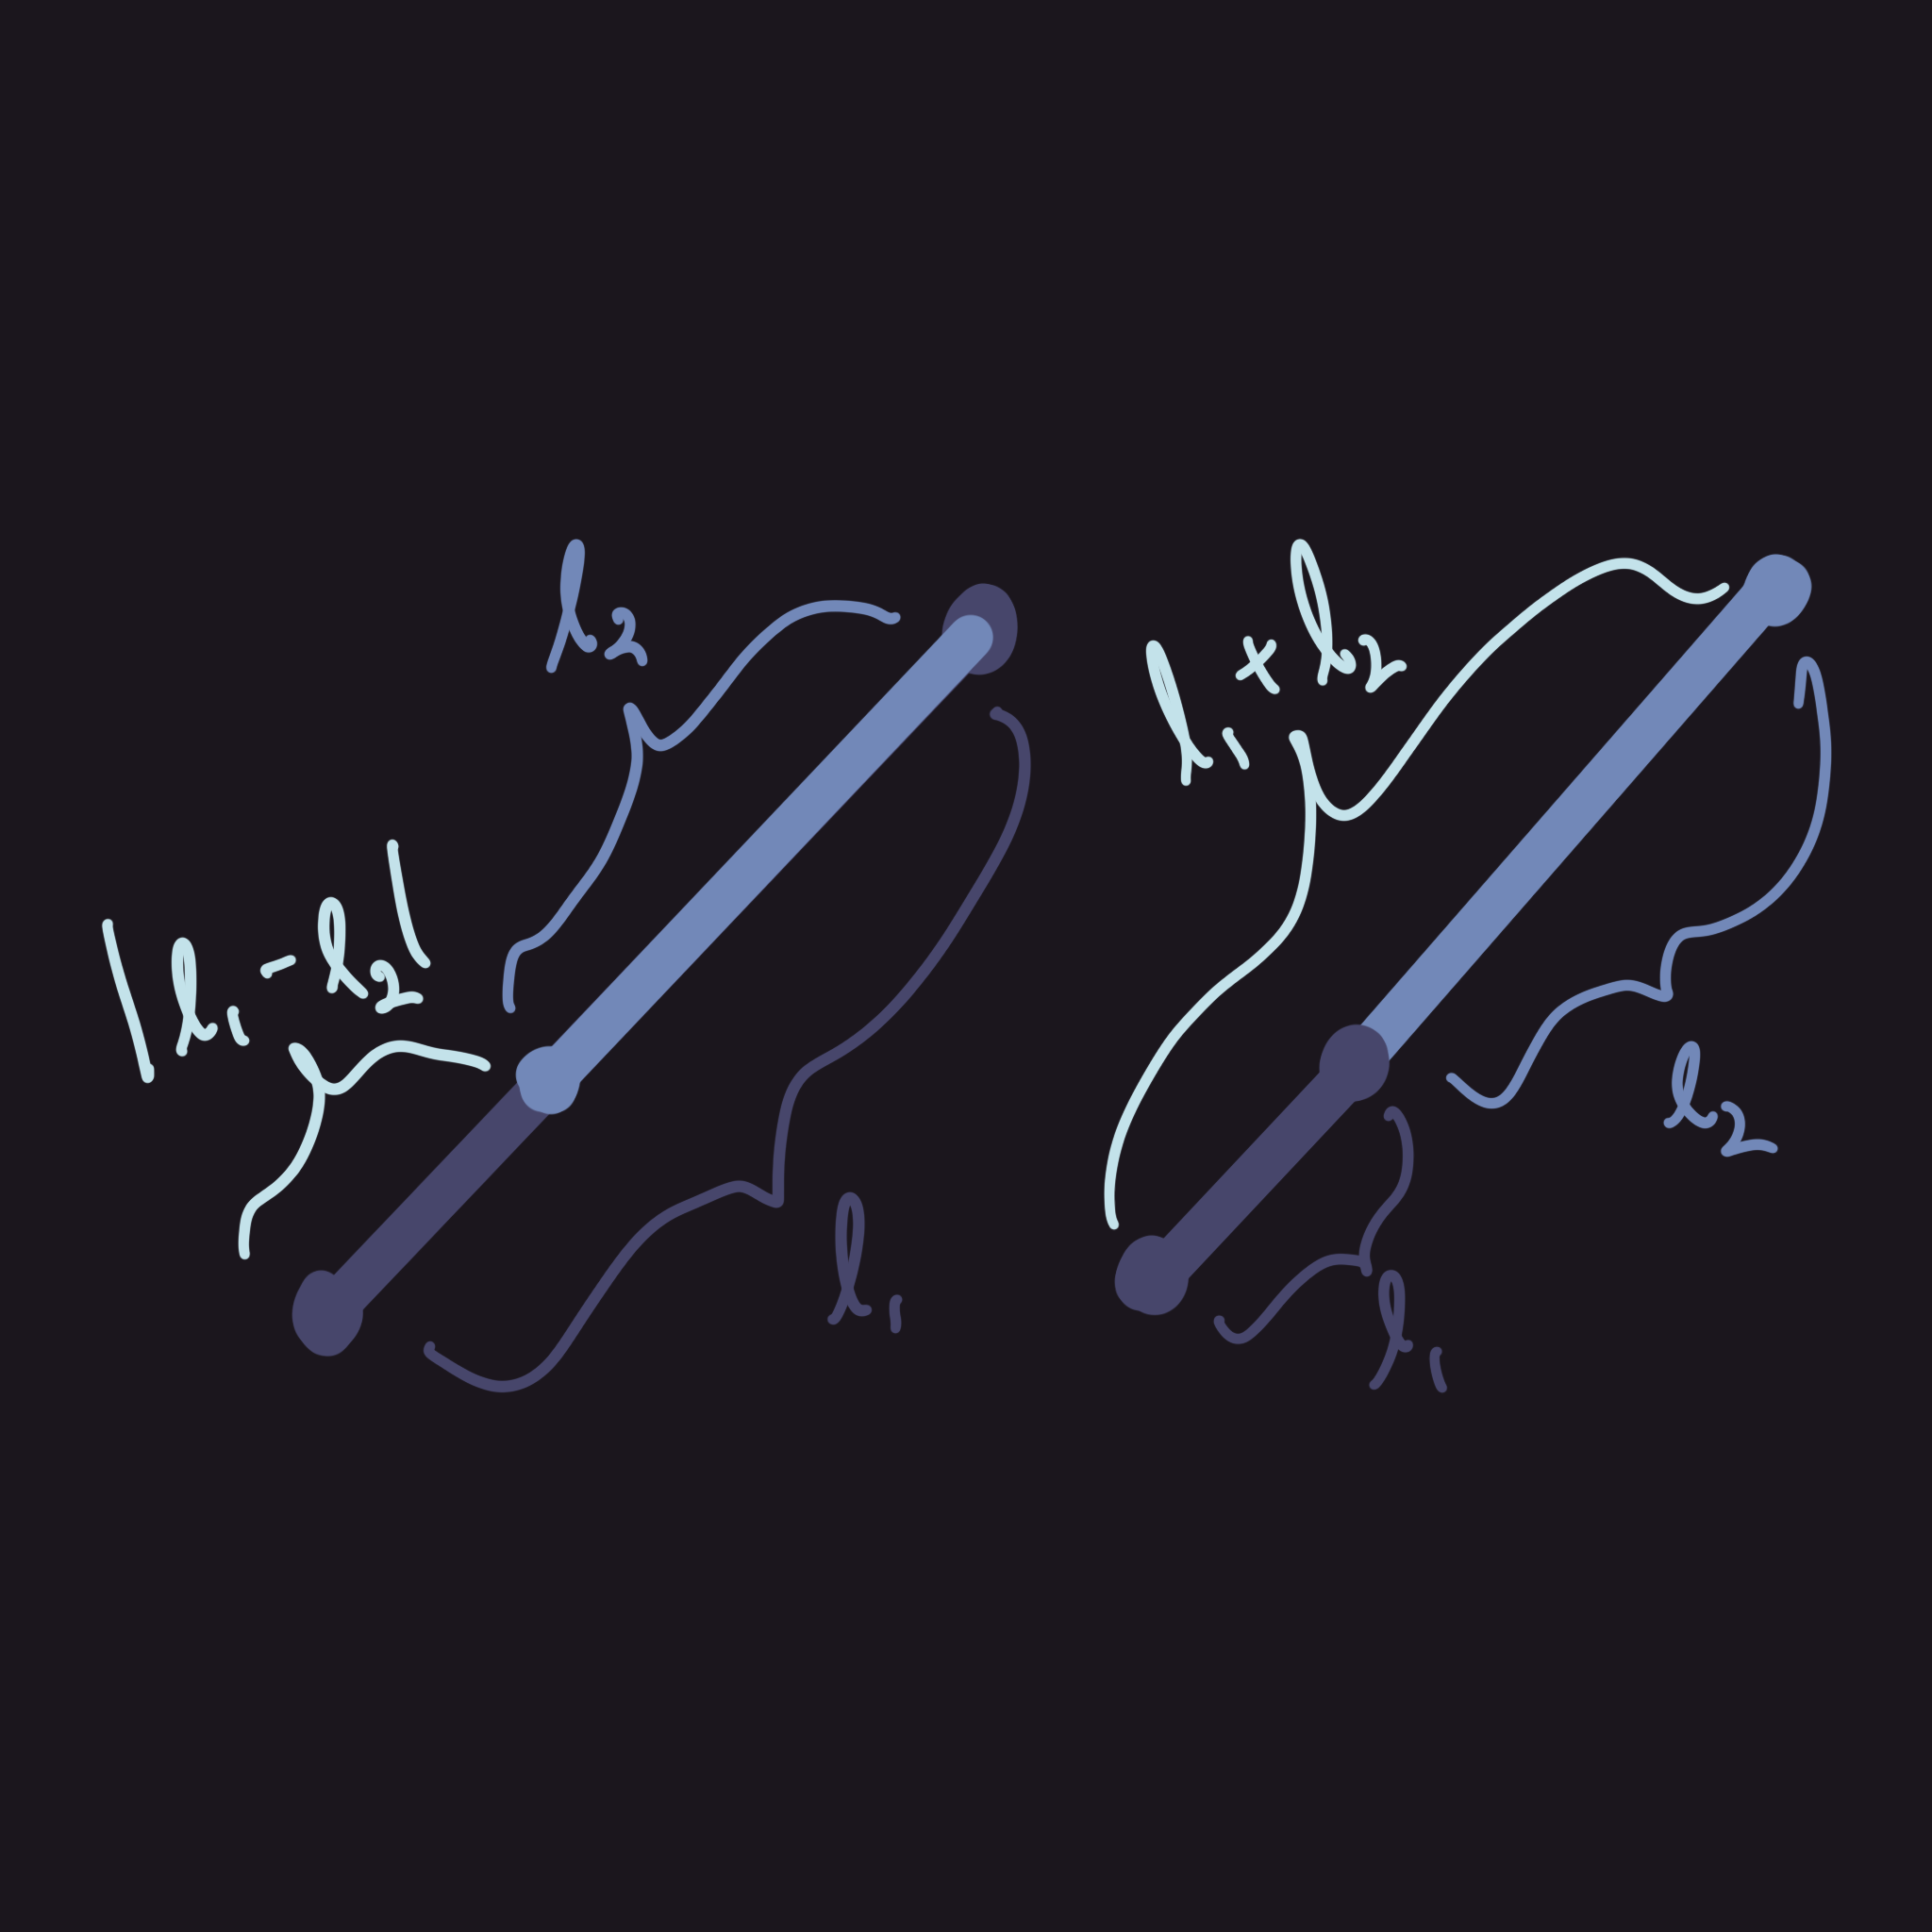
Errors only really occur when the triangle isn't possible. For example, if the target is in one of the dead-zones. We want to avoid this and pause any calculations if the target is out of range. The code below should be enough to avoid any errors related to math:
//  Add this before the inverse kinematics calculations
if (d > l1 + l2 || d < Math.Abs(l1 - l2))
    return;
We want d to be bound by $d\in[l_1+l_2,|l_1-l_2|]$ because there are some dead-zones that the arm cannot reach no matter what angle we apply on its joints. This diagram should illustrate it a little better.
Bone System
This system is quite simple and you already have everything you really need to set it up. The only variable that you need to introduce now is just the second joint as we need to be able to control its rotation.
public Transform joint1;There's just one more step before applying the rotation. Since all the joints are parented to each other, we need to set the local position of each to be equal to each link length:
//  This can be run every frame but theres no reason to (unless u specifically change it)
joint1.localPosition = Vector3.up * l1;
endEffector.localPosition = Vector3.up * l2;
After defining this, its as simple as just setting their rotations to the values that you had calculated, specifically angI + ang1 and ang2. You can use either localEulerAngles or Quaternions for this, it doesn't really matter but I find that quaternions are more consistent.
// localEulerAngles
origin.localEulerAngles = Vector3.right * Mathf.Rad2Deg * (angI + ang1);
joint1.localEulerAngles = -Vector3.right * Mathf.Rad2Deg * ang2;

// rotation
origin.rotation = Quaternion.AngleAxis(Mathf.Rad2Deg * (angI + ang1), Vector3.right);
joint1.localEulerAngles = Quaternion.AngleAxis(Mathf.Rad2Deg * ang2, -Vector3.right);
In this case, joint1's rotation is set to be negative as it should be in the opposite direction of how the origin was rotated. as the diagram before shows, it should pull back down since its an exterior angle.
Position System
This system requires us to calculate the position of each joint. It isn't too hard to do but its really just unnecessary as the other system already does that without losing on rotation control. Anyways, if you still want to do it this way, we need to calculate the other positions:
public Vector2 pos1;

// Calculate position using trig and multiply it by l1
pos1 = new Vector2(Mathf.Cos(angI + ang1), Mathf.Sin(angI + ang1)) * l1;

// Set the position
joint1.position = pos1;
Since we are returning when the target is out of range, we don't actually need to calculate the end effector's position since it should be the target's position. This also means we technically don't need to calculate ang2.
endEffector.position = target.position;This one does get a lot more complicated in a three-link system.
3-Link Implementation
In 2D, adding another link isn't all too complicated. It really only consists of changing a few things and adding some new variables. For the sake of it being less complicated, I will only cover the bone system but you are welcome to contact me if you are interested in the three-link solution using the position system.
// Add new joint and link length
public Transform joint2;
public float l3;

// Somewhat optional in 2D
float ang3;
Above are the new variables that are introduced however there are still some changes that must be made. First, the end effector should be the transform attached to the end of the last link. The idea for this solution is pretty simple because we can get away with just using transform.up instead of calculating the angles as we are working on a flat plane.
Since we are now in a three-link system, we actually need another constraint otherwise we would have infinite solutions. Of course you can always introduce your own constraints for whatever your needs are but for my purpose of animations, I found the easiest constraint to use is just the target transform's rotation.
Our approach to solving this is quite literally to somehow simplify this system down into a two-link then solve from there. An easy way to do this was just to use the up vector of the target and multiply it by $-l_3$ to get a new target for the two-link between the other joints.
Vector2 newTarget = target.position - l3 * target.up;

// Calculations

endEffector.up = target.up;
We can then feed this back into our two-link solver to get our values. Since we are on a flat surface, we don't have to worry about calculating the third angle as we can just set the up of joint2 to be target.up.
3D Implementation
The 3D implementation of this is quite simple up until we get to a three-link solution. The main premise is that we treat the 3D space as two separate planes, the xy-plane and the xz-plane. If you are trying to do this in Unreal or other systems that have different coordinate spaces, just make sure that the right axis (the axis you want to rotate around) should be shared among the two planes.
Technically, it isn't really an xy-plane but more of a plane made up of the y-axis and the vector target.position - origin.position. What we are trying to do is essentially rotate this plane and all the points on this plane so that it aligns with the global xy-plane. Once we do this we can literally just get solve it as if it was a 2D system then rotate it back. This does have issues when we do a three-link system, I will explain it later.
For these solutions, the position system becomes too complicated as we have a new dimension. It really isn't practical anyways so these solutions will talk about the bone system that is much more common.
Two-Link System

So first let's cover how we are going to project this onto a 2D plane.
In the diagram, the y-axis is coming out of the page (or going into the page depending on the handedness of your coordinate frames). Unity uses the left-hand rule meaning that the y-axis will come out of the page.
This is very important as you might need to negate some values if its using a right-handed system.
Anyways, this diagram should show the relationship between the two planes we want to construct. The plane constructed with the vector target - origin is expected to be able to freely rotate around the y-axis. This diagram doesn't show height well since its 2D but target - origin should be flattened onto the xz-plane to construct the plane although it doesn't matter to much if you define the plane using the cross product of target - origin and the y-axis.
I will be calling the plane constructed by target - origin and the y-axis the working plane from now on.
Flattening 3D onto 2D
The way our coordinate frame is setup, we can simply calculate the 2D position of any point on the working plane by using a distance formula. Given $(x,y,z)$ we can calculate the 2D position: $(\sqrt{x^2+z^2},y,0)$. If you want you can swap the places of x and z but it just change the code accordingly.
We also need to calculate the angle we need to rotate the xy-plane to be coincident with the working plane. We'll call this angle angY as we need to rotate around the y-axis to achieve this.
Variables that stay the same:
public Transform origin, joint1, endEffector, target;
public float l1, l2;

// Needs to be calculated
float d;
float angI, angA, angB;
New variables:
// the target inside of origin's coordinate space
public Vector2 t = target.position - origin.position;

// used to calculate angY
float xProj = new Vector2(t.x, t.z).magnitude;

float angY = -Mathf.Atan2(t.z, t.x);
The xProj calculation is simpler to write as the magnitude of the xz-components of the t vector but it functions the same as if you wrote Mathf.Sqrt(t.x * t.x + t.z * t.z);. The calculations for the other stuff is the same as 2D since it doesn't use any vectors.
float d = t.magnitude; // this one is the only one that changes with 3D

// use xProj instead of t.x or t.z
float angI = Mathf.Atan2(t.y, xProj);
float angA = Mathf.Acos((l1 * l1 + d * d - l2 * l2) / (2 * l1 * d));
float angB = Mathf.PI - Mathf.Acos((l1 * l1 + l2 * l2 - d * d) / (2 * l1 * l2));
The main difference between 2D and 3D is how we apply the rotations. Instead of localEulerAngles use quaternions with Quaternion.Euler they function pretty similar but quaternions work better:
origin.rotation *= Quaternion.Euler((angI + angA) * Mathf.Rad2Deg, 0, 0);
joint1.rotation = Quaternion.Euler(-angB * Mathf.Rad2Deg, 0, 0);
Use origin.rotation = Quaternion.Euler(...); if this is for a two-link system. The reason is important and will be discussed later.
Three-Link System
For this we can still use the same approach as we did in 2D. We just subtract the l3 * up vector of the target to get the new target and work from there. However an issue arises if we try and apply the same endEffector.up = target.up trick from before. The issue is that when the target moves around the origin, as in along the xz-plane, the last link no longer stays parallel with the other links. It looks pretty awkward but its not something you have to fix. I still will be fixing it because it does make quite a big difference on how the final product looks.
Here's how we set the three-link solution up:
// new variables
public float l3;
public Transform joint2;
float angC;

// changes to calculations
Vector3 t = target.position - origin.position - l3 * target.up;
Everything else stays relatively the same but we do need to address the problem with last link's rotation. This will take quite a bit of math to understand so its understandable if you want to skip this. If you do decide that this isn't worth it, make sure to change it back to origin.rotation = Quaternion.Euler(...).
What we are trying to do is just trying to rotate around target.position - origin.position then rotate the last link by angC. Here is the code that we need to add just so that all links will be coplanar.
// calculating the additional rotation we need to apply on the origin/shoulder
float yAng = -Mathf.Atan2(t.z, t.x);
origin.rotation = Quaternion.Euler(0, (yAng - Mathf.PI / 2) * Mathf.Rad2Deg, 0);

// get the axis to rotate around
Vector3 localUp = -targetUp;

// project onto plane to eliminate an axis
localUp = Vector3.ProjectOnPlane(localUp, t.normalized);

// calculate the angle to rotate around the axis
float roll = Mathf.Atan2(
    // construct a coordinate frame to calculate the angle
    Vector3.Dot(origin.up, localUp),
    Vector3.Dot(origin.right, localUp)
);

// use Space.World here since we manually calculated the other coordinate spaces
origin.Rotate(t.normalized, -(roll - Mathf.PI / 2) * Mathf.Rad2Deg, Space.World);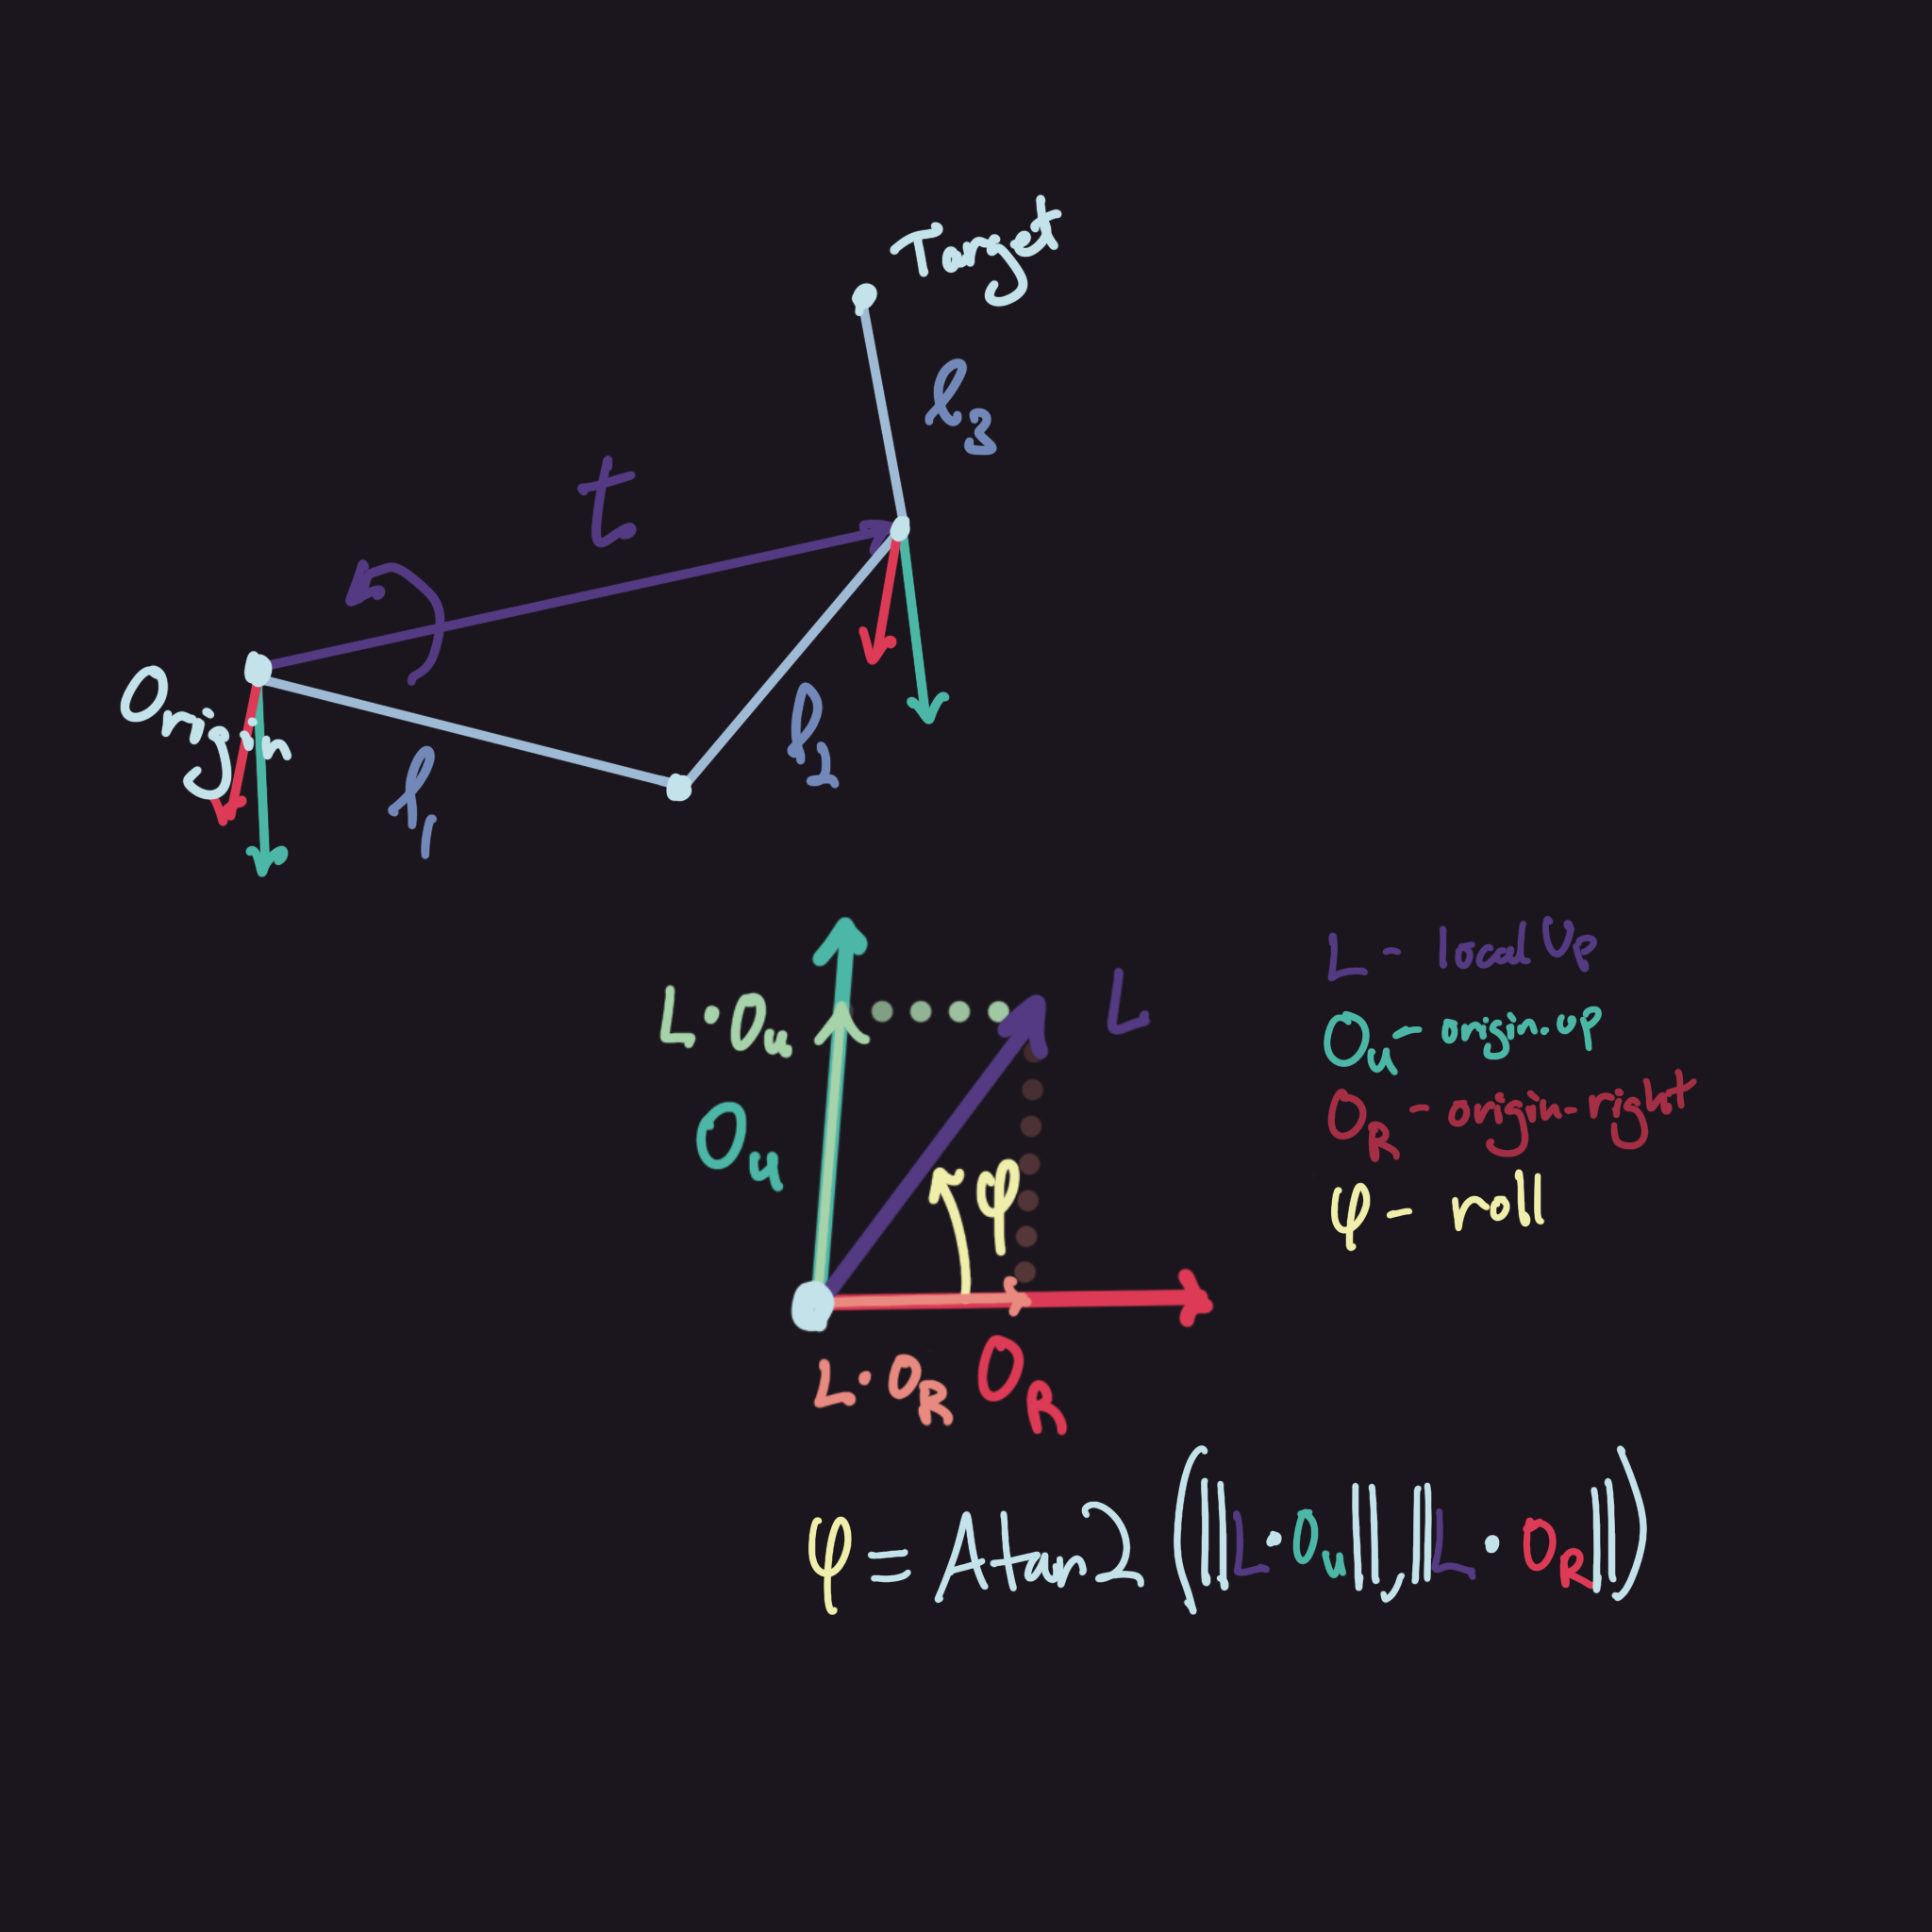
Looking at the diagram, we can see what the code above does. First, we need to orient the system to be on the same plane as origin.position - target.position, then we get the target up vector and use it to rotate the two-link system around t.normalized. To get how much we need to rotate, we simply just project the vector given by localUp onto the coordinate space of origin, giving us the local x and y values. Afterwards, just apply it inside of Atan2 to get the angle, then finally rotate the entire system by that value.
Now that we finished all of this, we just have one final step before completing our code. We need to calculate angC to orient the last link correctly. This can be calculated similarly to how we calculated roll. We get a vector, in this case just the target.up, and project it into the previous joint's coordinate space.
float angC = Mathf.Atan2(
 Vector3.Dot(target.up, -joint1.forward),
    Vector3.Dot(target.up, joint1.up)
);

joint2.localRotation = Quaternion.Euler(-angC * Mathf.Rad2Deg, 0, 0);
Negate joint1.forward or joint1.up since Unity uses a left-handed coordinate space. Otherwise, once you finish this step and combine everything together, you should be done!
Of course there are a bunch of stuff that can be changed but this is just talking about how you can set one up. Just fiddle with it on once you get it working then tune it for whatever use case you're using it for.